Category: .Net

  • CORS in ASP.NET Core: It’s More Than Just Fixing a Browser Error

    CORS in ASP.NET Core: It’s More Than Just Fixing a Browser Error

    I’ll admit something.

    For a long time, whenever I saw this error:

    “Access to fetch at ‘https://api.example.com‘ from origin ‘https://localhost:3000‘ has been blocked by CORS policy.”

    My first reaction was simple:

    “Let me add AllowAnyOrigin() and move on.”

    The application worked.

    The error disappeared.

    Problem solved… or so I thought.

    Later, I decided to understand what CORS was actually doing.

    And I realized something important:

    CORS isn’t a server feature. It’s a browser security feature.

    Your API might happily return a response.

    But the browser blocks JavaScript from accessing it if the request violates the server’s CORS policy.

    That’s why Postman works while the browser fails.


    What Is CORS?

    CORS (Cross-Origin Resource Sharing) is a mechanism that allows a server to specify which origins can access its resources.

    An origin consists of:

    • Protocol (https)
    • Domain (example.com)
    • Port (5001)

    If any of these differ, the browser considers it a different origin.

    For example:

    https://localhost:3000
    

    and

    https://localhost:5001
    

    are different origins.


    Configuring CORS in ASP.NET Core

    Register a policy:

    builder.Services.AddCors(options =>
    {
        options.AddPolicy("FrontendPolicy", policy =>
        {
            policy.WithOrigins("https://localhost:3000")
                  .AllowAnyHeader()
                  .AllowAnyMethod();
        });
    });
    

    Apply the policy:

    app.UseCors("FrontendPolicy");
    

    Avoid This in Production

    .AllowAnyOrigin()
    

    While it’s convenient during development, allowing every origin in production can expose your API unnecessarily.

    Instead, explicitly specify the trusted origins your application should allow.


    Middleware Order Matters

    A common mistake is placing UseCors() in the wrong position.

    A typical pipeline looks like this:

    app.UseRouting();
    
    app.UseCors("FrontendPolicy");
    
    app.UseAuthentication();
    
    app.UseAuthorization();
    
    app.MapControllers();
    

    If CORS isn’t applied at the correct point in the pipeline, the browser may still block requests.


    Final Thoughts

    Today, I don’t configure CORS just to remove an error message.

    I configure it knowing why the browser enforces it and how it protects users.

    Understanding the reason behind a feature is far more valuable than memorizing the code to make an error disappear.

  • Entity Framework vs Entity Framework Core: What’s the Difference?

    Entity Framework vs Entity Framework Core: What’s the Difference?

    Many developers assume Entity Framework (EF6) and Entity Framework Core (EF Core) are simply different versions of the same framework.

    They’re not.

    EF Core was redesigned from the ground up to meet the needs of modern .NET applications. While both are Object-Relational Mappers (ORMs), they differ significantly in architecture, performance, and capabilities.

    Let’s explore the key differences.


    What is Entity Framework (EF6)?

    Entity Framework 6 is the classic ORM designed primarily for the .NET Framework.

    It simplifies database access by allowing developers to work with C# objects instead of writing SQL for every operation.

    EF6 is mature, stable, and still maintained, making it a suitable choice for many existing .NET Framework applications.


    What is Entity Framework Core?

    Entity Framework Core is Microsoft’s modern ORM for .NET (formerly .NET Core).

    It was rewritten with a focus on:

    • Cross-platform support
    • High performance
    • Better extensibility
    • Modern application development
    • Cloud-native workloads

    It powers most new ASP.NET Core applications today.


    Key Differences

    FeatureEntity Framework (EF6)Entity Framework Core
    Target Platform.NET FrameworkModern .NET (.NET 6/7/8/9+)
    Cross-Platform❌ No✅ Yes
    PerformanceGoodBetter for most workloads
    LINQ TranslationMatureMore optimized and actively evolving
    Dependency InjectionLimitedBuilt-in support
    Batch OperationsLimitedImproved support
    MigrationsSupportedMore flexible and actively developed
    Cloud & ContainersLimitedDesigned with modern deployment in mind

    Performance

    EF Core generally performs better because it was designed with performance in mind.

    It includes improvements such as:

    • Faster query execution
    • Better SQL generation
    • More efficient change tracking
    • Compiled queries
    • Split queries for complex object graphs

    These features can make a noticeable difference in high-traffic applications.


    Which One Should You Choose?

    Choose EF6 if:

    • You’re maintaining an existing .NET Framework application.
    • Migrating to modern .NET isn’t currently feasible.
    • The application is stable and doesn’t require new EF Core features.

    Choose EF Core if:

    • You’re starting a new project.
    • You’re building an ASP.NET Core application.
    • You need cross-platform support.
    • Performance and scalability are important.
    • You want access to the latest features and ongoing improvements.

    Migration Considerations

    Migrating from EF6 to EF Core isn’t always a simple package upgrade.

    Some APIs and behaviors differ, and applications with heavy customizations may require code changes and testing.

    Plan the migration carefully and validate functionality before moving to production.


    Final Thoughts

    Both EF6 and EF Core are capable ORMs, but they’re designed for different generations of .NET development.

    • Maintaining a legacy .NET Framework application? EF6 is still a solid choice.
    • Building a modern application? EF Core should be your default choice.

    Technology evolves, and EF Core represents Microsoft’s long-term direction for data access in the .NET ecosystem.

  • Creating Custom Middleware Extensions in ASP.NET Core: Keep Your Program.cs Clean

    Creating Custom Middleware Extensions in ASP.NET Core: Keep Your Program.cs Clean

    As an ASP.NET Core application grows, Program.cs can quickly become cluttered with middleware registrations.

    For example:

    app.UseMiddleware<RequestLoggingMiddleware>();
    app.UseMiddleware<ApiKeyMiddleware>();
    app.UseMiddleware<TenantMiddleware>();
    app.UseMiddleware<RequestValidationMiddleware>();
    app.UseMiddleware<MaintenanceModeMiddleware>();
    

    While this works, it’s not the cleanest approach.

    A better practice is to create extension methods that encapsulate middleware registration.


    Step 1: Create Your Middleware

    public class RequestLoggingMiddleware
    {
        private readonly RequestDelegate _next;
    
        public RequestLoggingMiddleware(RequestDelegate next)
        {
            _next = next;
        }
    
        public async Task InvokeAsync(HttpContext context)
        {
            Console.WriteLine($"Request: {context.Request.Path}");
    
            await _next(context);
    
            Console.WriteLine($"Response: {context.Response.StatusCode}");
        }
    }
    

    Step 2: Create an Extension Method

    Create a static extension class:

    public static class RequestLoggingMiddlewareExtensions
    {
        public static IApplicationBuilder UseRequestLogging(
            this IApplicationBuilder app)
        {
            return app.UseMiddleware<RequestLoggingMiddleware>();
        }
    }
    

    Now your middleware has a meaningful and reusable registration method.


    Step 3: Register It

    Instead of:

    app.UseMiddleware<RequestLoggingMiddleware>();
    

    Use:

    app.UseRequestLogging();
    

    This makes Program.cs much cleaner and easier to read.


    Why Use Extension Methods?

    ✅ Improved Readability

    Instead of exposing implementation details, your pipeline reads like documentation.

    app.UseRequestLogging();
    app.UseApiKeyValidation();
    app.UseTenantValidation();
    app.UseMaintenanceMode();
    

    ✅ Better Maintainability

    If the middleware implementation changes, the registration code remains the same.


    ✅ Reusability

    The extension method can be shared across multiple projects or packaged into a reusable library.


    ✅ Encapsulation

    Consumers don’t need to know whether you’re using:

    • UseMiddleware<T>()
    • Multiple middleware components
    • Additional configuration

    Everything is hidden behind a simple method.


    Real-World Example

    Many built-in ASP.NET Core middleware components follow this pattern:

    app.UseAuthentication();
    
    app.UseAuthorization();
    
    app.UseCors();
    
    app.UseSession();
    
    app.UseSwagger();
    

    These are all extension methods internally.

    Following the same pattern makes your custom middleware feel like a natural part of ASP.NET Core.


    Best Practices

    ✔ Keep each middleware focused on a single responsibility.

    ✔ Give extension methods meaningful names.

    ✔ Place extensions in a dedicated Extensions folder.

    ✔ Use XML comments if the middleware is part of a shared library.


    Final Thoughts

    Creating extension methods for custom middleware is a small change that greatly improves the readability and maintainability of your application.

    A clean Program.cs makes it easier for new developers to understand the request pipeline and keeps your startup configuration organized.

    When building professional ASP.NET Core applications, aim for code that is not only functional but also easy to read and maintain.

  • Understanding the ASP.NET Core Middleware Pipeline: Why Order Matters

    Understanding the ASP.NET Core Middleware Pipeline: Why Order Matters

    One of the most common mistakes in ASP.NET Core applications isn’t writing incorrect business logic—it’s configuring the middleware pipeline in the wrong order.

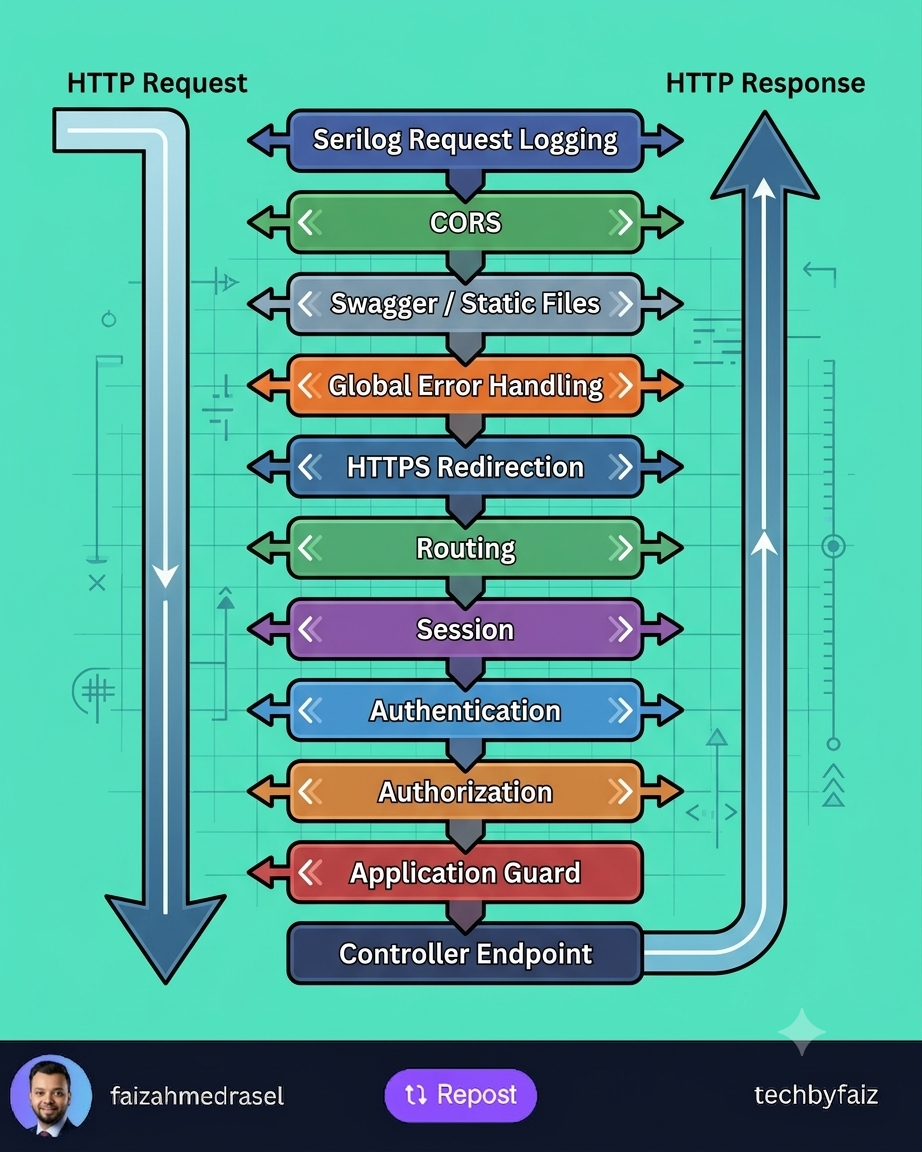
    Middleware works like a series of checkpoints.

    Every incoming HTTP request passes through each middleware before reaching your controller, and the response travels back through the same pipeline in reverse.

    Request
        │
        ▼
    Serilog Request Logging
        │
        ▼
    CORS
        │
        ▼
    Swagger / Static Files
        │
        ▼
    Global Exception Handling
        │
        ▼
    HTTPS Redirection
        │
        ▼
    Routing
        │
        ▼
    Session
        │
        ▼
    Authentication
        │
        ▼
    Authorization
        │
        ▼
    Application Guard / Custom Middleware
        │
        ▼
    Controller Endpoint
        │
        ▼
    Response
    

    Let’s understand why each middleware appears where it does.


    1. Serilog Request Logging

    This should be near the beginning of the pipeline.

    Why?

    It records every incoming request along with response time, status code, and exceptions, giving you complete visibility into request processing.


    2. CORS

    CORS should run before authentication and endpoint execution.

    Its job is to determine whether a browser is allowed to access your API.

    If the request isn’t allowed, there’s no reason to continue processing it.


    3. Swagger & Static Files

    These requests usually don’t require authentication or business logic.

    Serving them early reduces unnecessary processing and improves performance.


    4. Global Exception Handling

    Unexpected exceptions can occur anywhere in the pipeline.

    By placing exception handling early, you can return consistent error responses instead of exposing internal details or crashing the application.


    5. HTTPS Redirection

    Redirect HTTP requests to HTTPS before processing sensitive operations.

    This ensures all subsequent middleware works over a secure connection.


    6. Routing

    Routing determines which endpoint matches the incoming request.

    Without routing, ASP.NET Core doesn’t know which controller or endpoint should handle the request.


    7. Session

    If your application uses sessions, initialize them before components that depend on session data.


    8. Authentication

    Authentication answers the question:

    Who is the user?

    It validates credentials such as JWT tokens or cookies and builds the user’s identity.


    9. Authorization

    Authorization answers a different question:

    Is this authenticated user allowed to perform this action?

    This is why it must come after authentication.

    Without knowing who the user is, authorization cannot make access decisions.


    10. Application Guard (Custom Middleware)

    Many applications include custom middleware for:

    • Tenant validation
    • Subscription checks
    • Maintenance mode
    • API key validation
    • Request throttling
    • Business-specific security rules

    By this stage, routing, authentication, and authorization have already been completed, making user and route information available.


    11. Controller Endpoint

    Only after all middleware checks have passed does the request reach the controller.

    The controller executes business logic, calls services, and returns a response.


    Why Middleware Order Matters

    Imagine placing UseAuthorization() before UseAuthentication().

    Authorization would execute before the user is identified, causing access checks to fail.

    Similarly, placing exception handling too late may leave some exceptions unhandled.

    Correct middleware ordering ensures:

    • Better security
    • Improved performance
    • Consistent error handling
    • Easier debugging
    • Predictable request processing

    Final Thoughts

    The middleware pipeline is the backbone of every ASP.NET Core application.

    Understanding not just the order—but the purpose of each middleware—helps you build secure, maintainable, and high-performing APIs.

    Remember:

    In ASP.NET Core, the order of middleware is just as important as the middleware itself.

  • 𝗔𝗦𝗣.𝗡𝗘𝗧 𝗖𝗼𝗿𝗲-এ 𝗮𝗽𝗽.𝗨𝘀𝗲𝗦𝘄𝗮𝗴𝗴𝗲𝗿() এবং 𝗮𝗽𝗽.𝗨𝘀𝗲𝗦𝘄𝗮𝗴𝗴𝗲𝗿𝗨𝗜() কেন ব্যবহার করা হয়?

    𝗔𝗦𝗣.𝗡𝗘𝗧 𝗖𝗼𝗿𝗲-এ 𝗮𝗽𝗽.𝗨𝘀𝗲𝗦𝘄𝗮𝗴𝗴𝗲𝗿() এবং 𝗮𝗽𝗽.𝗨𝘀𝗲𝗦𝘄𝗮𝗴𝗴𝗲𝗿𝗨𝗜() কেন ব্যবহার করা হয়?

    ধরুন, আপনি একটি নতুন Web API তৈরি করেছেন।

    সব endpoint ঠিকমতো কাজ করছে।

    আপনি Postman দিয়ে test করছেন।

    কিন্তু হঠাৎ আপনার টিমের একজন Developer এসে বলল,

    “API-এর documentation কোথায়?”

    আপনি বললেন,

    “Postman Collection আছে।”

    সে আবার বলল,

    “নতুন Developer join করলে কি Postman Collection দিয়েই সব বুঝতে হবে?”

    এখানেই Swagger-এর প্রয়োজনীয়তা শুরু।

    Swagger আসলে কী?

    Swagger হলো এমন একটি tool যা আপনার Web API-এর documentation automatically তৈরি করে।

    অর্থাৎ, আপনার API-তে কী কী endpoint আছে,

    • কোন URL
    • কোন HTTP Method (GET, POST, PUT, DELETE)
    • কী parameter লাগবে
    • কী response আসবে

    সবকিছু সুন্দরভাবে একটি UI-তে দেখিয়ে দেয়।


    তাহলে app.UseSwagger() কী করে?

    app.UseSwagger();
    

    এই লাইনটি Swagger-এর JSON documentation generate করে।

    যেমন:

    /swagger/v1/swagger.json
    

    এই JSON file-এর মধ্যেই আপনার পুরো API-এর description থাকে।

    অর্থাৎ এটি UI নয়।

    এটি শুধুমাত্র API-এর metadata তৈরি করে।


    তাহলে app.UseSwaggerUI() কী করে?

    app.UseSwaggerUI();
    

    এই লাইনটি সেই JSON file-কে একটি সুন্দর Web UI-তে দেখায়।

    ফলে Browser থেকে আপনি দেখতে পারেন—

    ✅ সব Endpoint

    ✅ Request Body

    ✅ Parameters

    ✅ Response

    ✅ এমনকি Browser থেকেই API Call করতে পারেন।


    বাস্তব উদাহরণ

    ধরুন আপনি একটি Food Delivery API বানিয়েছেন।

    Swagger UI খুললে দেখতে পারবেন—

    GET     /api/restaurants
    
    GET     /api/restaurants/{id}
    
    POST    /api/orders
    
    PUT     /api/orders/{id}
    
    DELETE  /api/orders/{id}
    

    প্রতিটি endpoint-এ ক্লিক করে আপনি Request পাঠাতে পারবেন।

    Postman খুলারও দরকার হবে না।


    যদি শুধু UseSwagger() লিখেন?

    তাহলে JSON তৈরি হবে।

    কিন্তু Browser-এ সুন্দর UI পাবেন না।


    যদি শুধু UseSwaggerUI() লিখেন?

    Swagger UI দেখানোর জন্য JSON দরকার।

    UseSwagger() না থাকলে UI কাজ করতে পারবে না।

    অর্থাৎ—

    দুইটি middleware একে অপরের উপর নির্ভরশীল।


    Development Environment-এ কেন বেশি ব্যবহার করা হয়?

    অনেক Project-এ আপনি এমন Code দেখবেন—

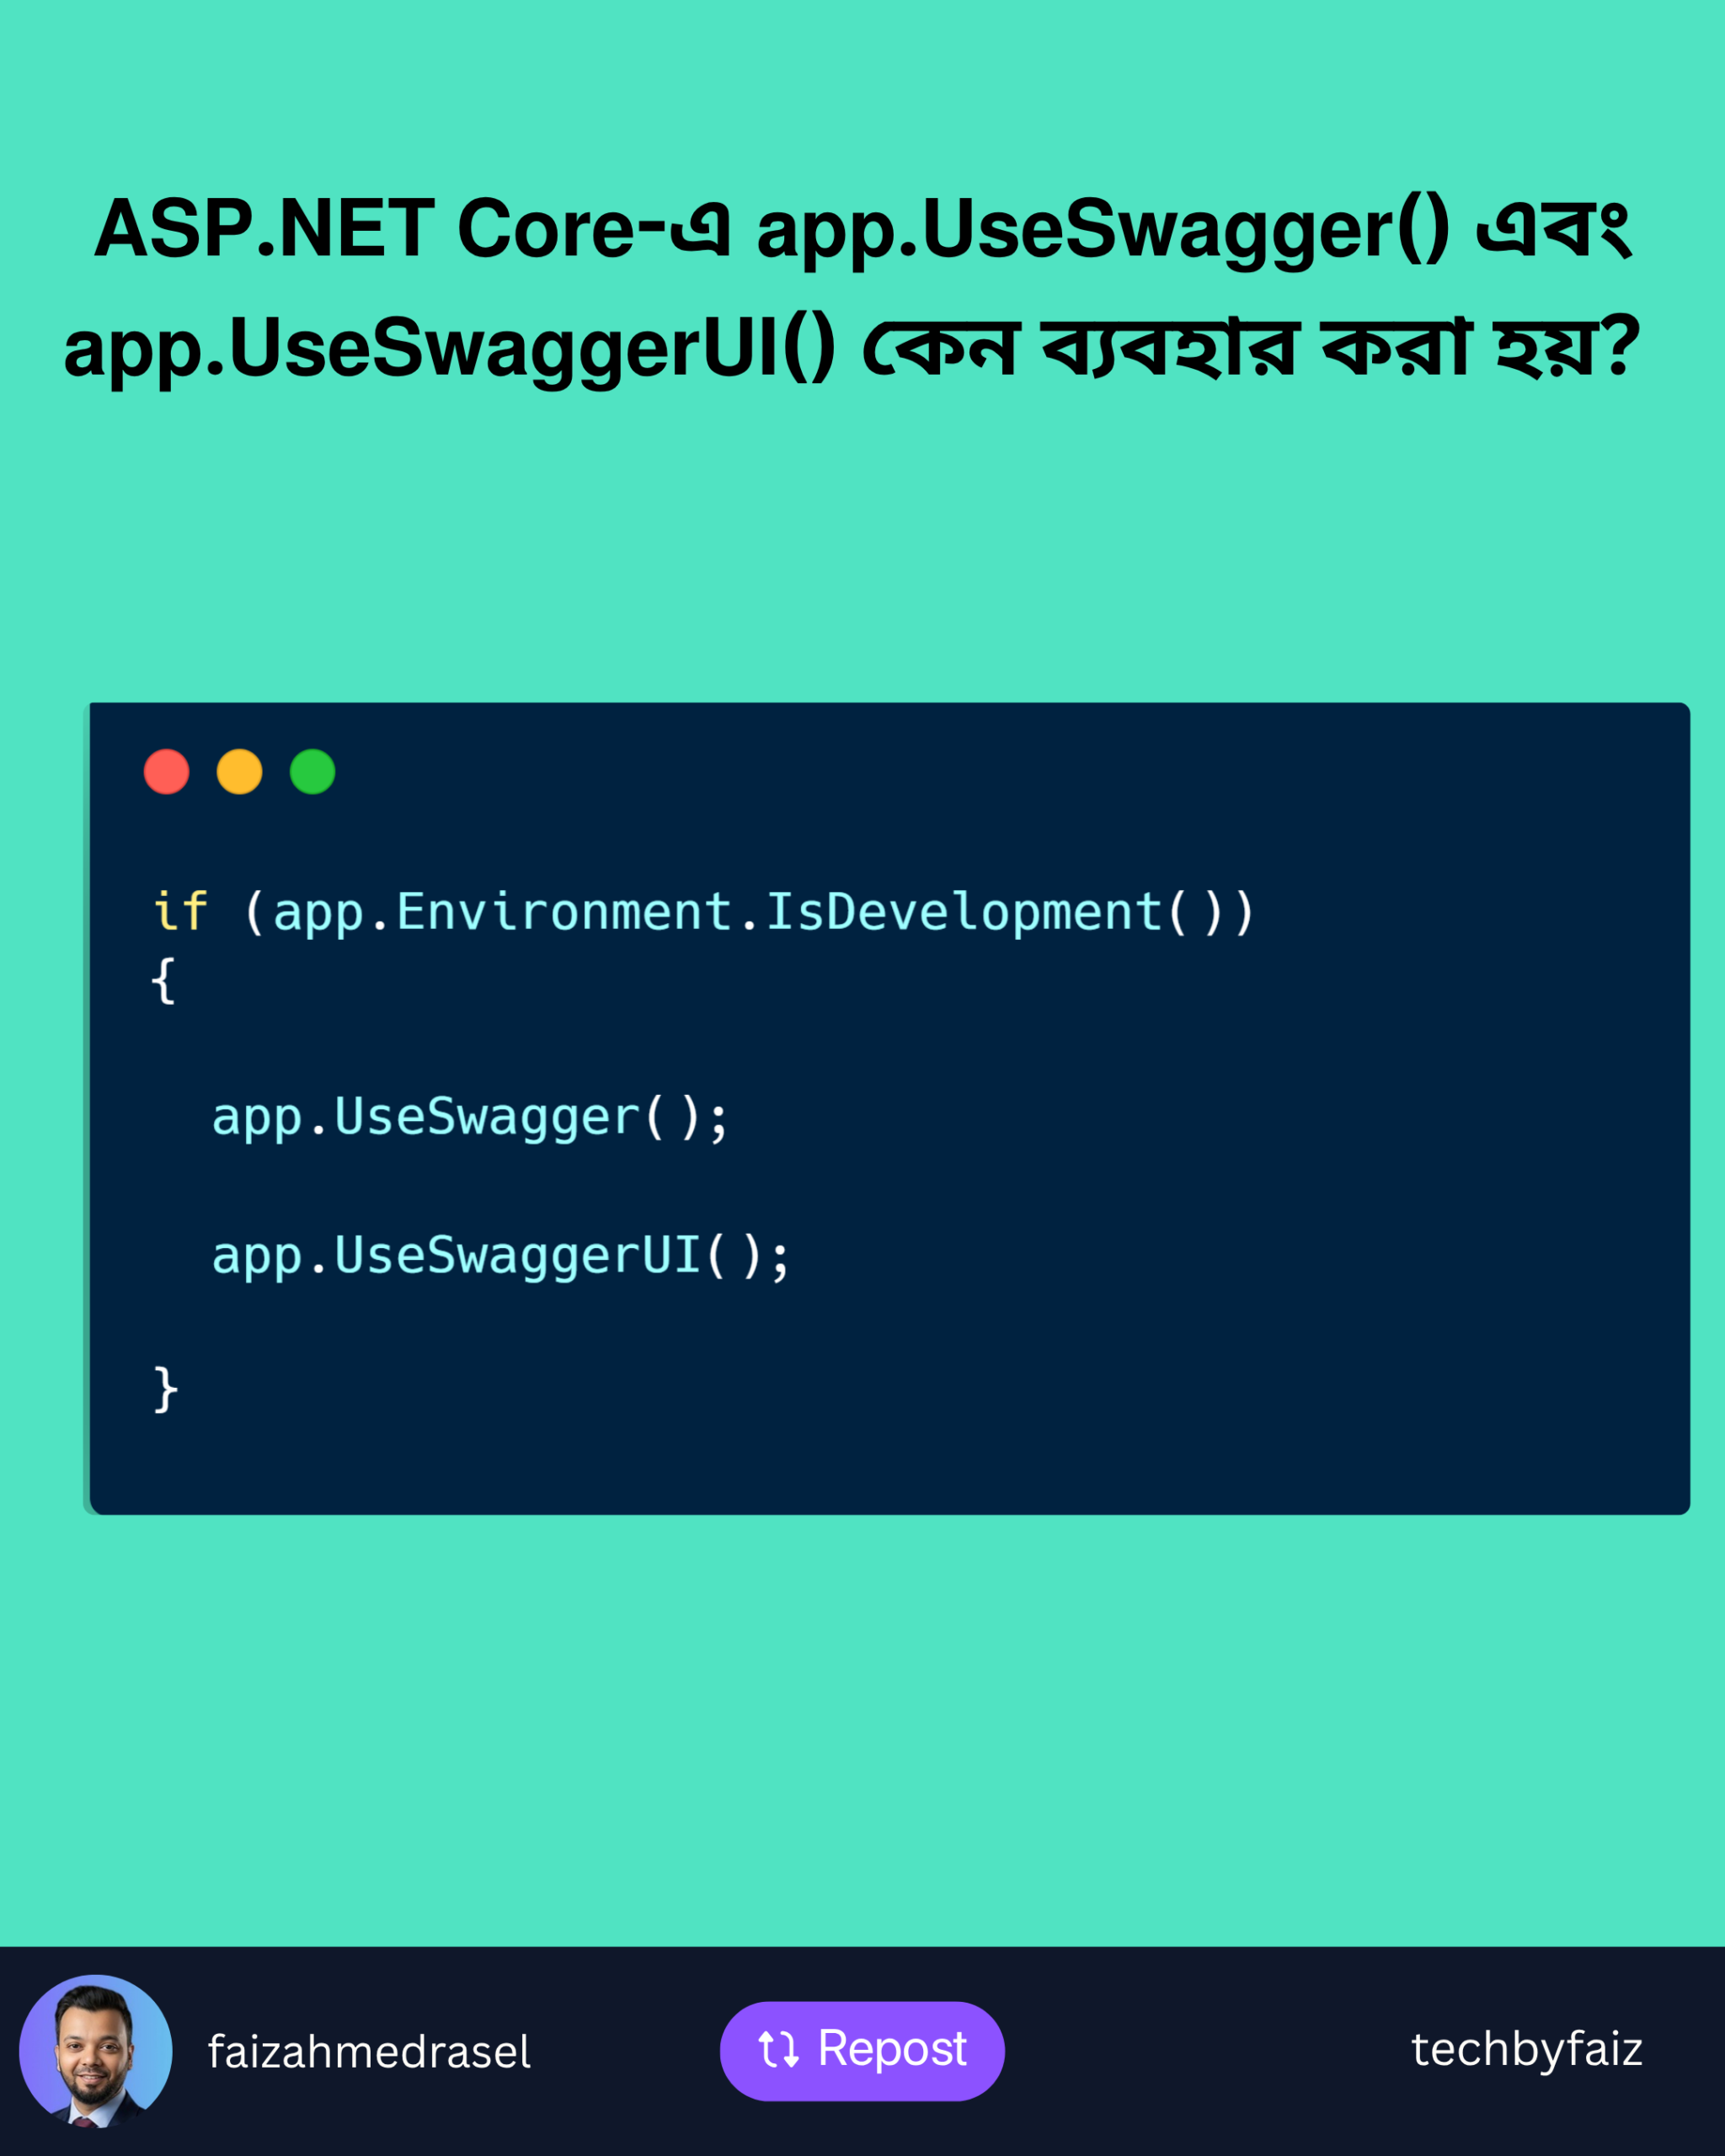
    if (app.Environment.IsDevelopment())
    {
        app.UseSwagger();
        app.UseSwaggerUI();
    }
    

    কারণ Production Environment-এ অনেক সময় API documentation public রাখা হয় না।

    Security-এর কারণেও অনেক প্রতিষ্ঠান Production-এ Swagger disable করে রাখে।


    আমার পরামর্শ

    Swagger শুধু API দেখানোর জন্য নয়।

    এটি Team Collaboration অনেক সহজ করে।

    নতুন Developer onboarding, Frontend integration, QA testing—সব ক্ষেত্রেই Swagger অসাধারণ একটি tool।

    আমার মতে, ASP.NET Core শিখতে গেলে Swagger বোঝা বাধ্যতামূলক।

    কারণ এটি শুধু documentation নয়, এটি আপনার API-এর “Interactive User Manual”।

  • 𝗜𝗔𝗰𝘁𝗶𝗼𝗻𝗥𝗲𝘀𝘂𝗹𝘁 𝘃𝘀 𝗔𝗰𝘁𝗶𝗼𝗻𝗥𝗲𝘀𝘂𝗹𝘁 𝘃𝘀 𝗔𝗰𝘁𝗶𝗼𝗻𝗥𝗲𝘀𝘂𝗹𝘁 𝗶𝗻 𝗔𝗦𝗣.𝗡𝗘𝗧 𝗖𝗼𝗿𝗲: 𝗪𝗵𝗶𝗰𝗵 𝗢𝗻𝗲 𝗦𝗵𝗼𝘂𝗹𝗱 𝗬𝗼𝘂 𝗨𝘀𝗲?

    𝗜𝗔𝗰𝘁𝗶𝗼𝗻𝗥𝗲𝘀𝘂𝗹𝘁 𝘃𝘀 𝗔𝗰𝘁𝗶𝗼𝗻𝗥𝗲𝘀𝘂𝗹𝘁 𝘃𝘀 𝗔𝗰𝘁𝗶𝗼𝗻𝗥𝗲𝘀𝘂𝗹𝘁 𝗶𝗻 𝗔𝗦𝗣.𝗡𝗘𝗧 𝗖𝗼𝗿𝗲: 𝗪𝗵𝗶𝗰𝗵 𝗢𝗻𝗲 𝗦𝗵𝗼𝘂𝗹𝗱 𝗬𝗼𝘂 𝗨𝘀𝗲?

    When building ASP.NET Core Web APIs, one of the most common questions is:

    Should I return IActionResult, ActionResult, or ActionResult<T> from my controller actions?

    Although they seem similar, each serves a different purpose. Choosing the right one makes your API more readable, maintainable, and expressive.

    What is IActionResult?

    IActionResult is an interface that represents the result of an action method.

    It allows your action to return different types of HTTP responses.

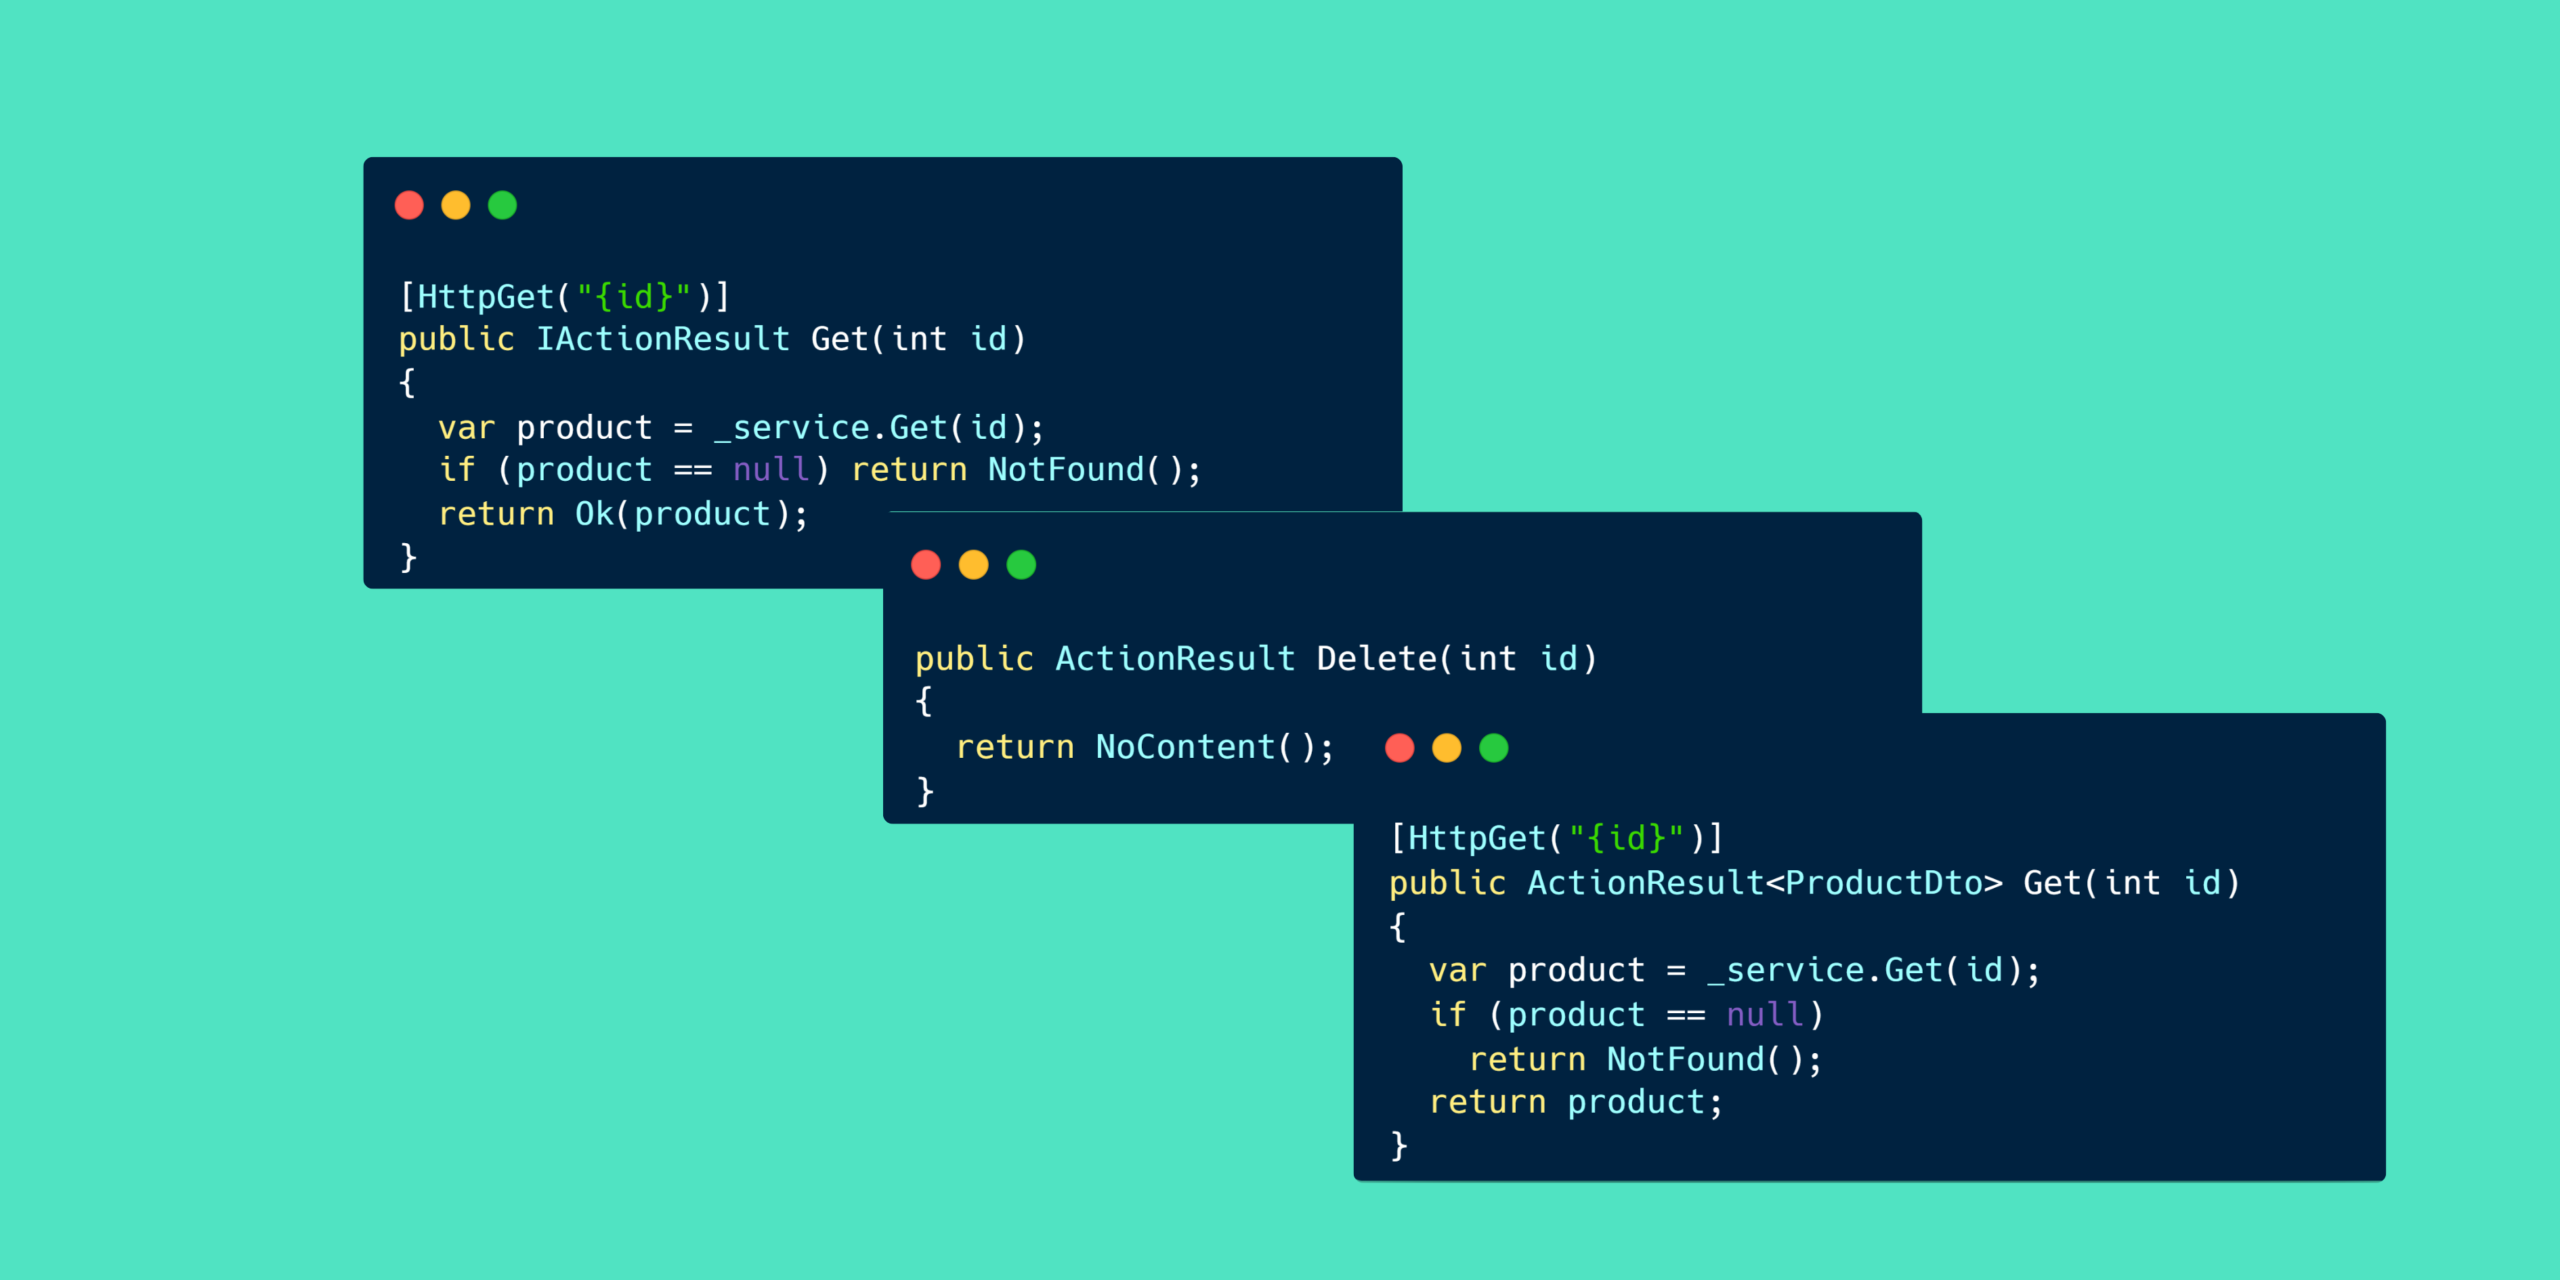
    Example:

    [HttpGet("{id}")]
    public IActionResult Get(int id)
    {
        var product = _service.Get(id);
    
        if (product == null)
            return NotFound();
    
        return Ok(product);
    }
    

    Since both NotFound() and Ok() implement IActionResult, the method can return either response.

    When to use IActionResult

    • Multiple possible HTTP responses
    • Endpoints that don’t return a specific model
    • File downloads
    • Redirects
    • Custom response logic

    What is ActionResult?

    ActionResult is a concrete implementation of IActionResult.

    In practice, it behaves similarly, but most developers now prefer either IActionResult or ActionResult<T> depending on the scenario.

    Example:

    public ActionResult Delete(int id)
    {
        return NoContent();
    }
    

    For actions that don’t return a data model, ActionResult is perfectly valid.


    What is ActionResult<T>?

    ActionResult<T> combines a strongly typed response model with the flexibility to return HTTP status codes.

    Example:

    [HttpGet("{id}")]
    public ActionResult<ProductDto> Get(int id)
    {
        var product = _service.Get(id);
    
        if (product == null)
            return NotFound();
    
        return product;
    }
    

    Notice that when the request succeeds, you can simply return the model.

    ASP.NET Core automatically wraps it in a 200 OK response.

    If something goes wrong, you can still return NotFound(), BadRequest(), or any other HTTP result.


    Comparison

    FeatureIActionResultActionResultActionResult
    Returns different HTTP responses
    Strongly typed response
    Better API documentation
    Works well with Swagger/OpenAPILimitedLimitedExcellent

    Which One Should You Choose?

    Use IActionResult when:

    • Returning files
    • Redirecting users
    • Returning different response formats
    • No specific response model exists

    Use ActionResult

    • Simple endpoints without a response model
    • Commands such as Delete or Update that mainly return status codes

    Use ActionResult<T>

    • REST APIs returning DTOs
    • CRUD endpoints
    • APIs documented with Swagger/OpenAPI
    • Most modern ASP.NET Core Web APIs

    Best Practice

    For APIs that return data, prefer ActionResult<T>.

    It provides:

    • Strong typing
    • Better IntelliSense
    • Cleaner code
    • Improved Swagger documentation
    • Clearer API contracts

    Use IActionResult when your action’s primary purpose is to return different kinds of responses rather than a specific model.

    Final Thoughts

    There isn’t a single “best” return type.

    The right choice depends on what your endpoint is designed to return.

    As a general guideline:

    • Returning data?ActionResult<T>
    • Returning only status codes?ActionResult
    • Returning multiple response types (files, redirects, custom results)?IActionResult

    Choosing the appropriate return type makes your API easier to understand for both developers and API consumers.

  • 𝗦𝗽𝗮𝗻 𝘃𝘀 𝗠𝗲𝗺𝗼𝗿𝘆 𝗶𝗻 .𝗡𝗘𝗧: 𝗨𝗻𝗱𝗲𝗿𝘀𝘁𝗮𝗻𝗱𝗶𝗻𝗴 𝗛𝗶𝗴𝗵-𝗣𝗲𝗿𝗳𝗼𝗿𝗺𝗮𝗻𝗰𝗲 𝗠𝗲𝗺𝗼𝗿𝘆 𝗠𝗮𝗻𝗮𝗴𝗲𝗺𝗲𝗻𝘁

    𝗦𝗽𝗮𝗻 𝘃𝘀 𝗠𝗲𝗺𝗼𝗿𝘆 𝗶𝗻 .𝗡𝗘𝗧: 𝗨𝗻𝗱𝗲𝗿𝘀𝘁𝗮𝗻𝗱𝗶𝗻𝗴 𝗛𝗶𝗴𝗵-𝗣𝗲𝗿𝗳𝗼𝗿𝗺𝗮𝗻𝗰𝗲 𝗠𝗲𝗺𝗼𝗿𝘆 𝗠𝗮𝗻𝗮𝗴𝗲𝗺𝗲𝗻𝘁

    When building high-performance .NET applications, reducing memory allocations can significantly improve performance and lower garbage collection (GC) pressure.

    That’s where Span<T> and Memory<T> come in.

    Although they look similar, they are designed for different scenarios. Understanding when to use each can help you write faster and more memory-efficient applications.

    What is Span<T>?

    Span<T> is a lightweight type that provides a safe and efficient view over a contiguous region of memory.

    Instead of creating a copy of an array or string, it lets you work with the existing memory directly.

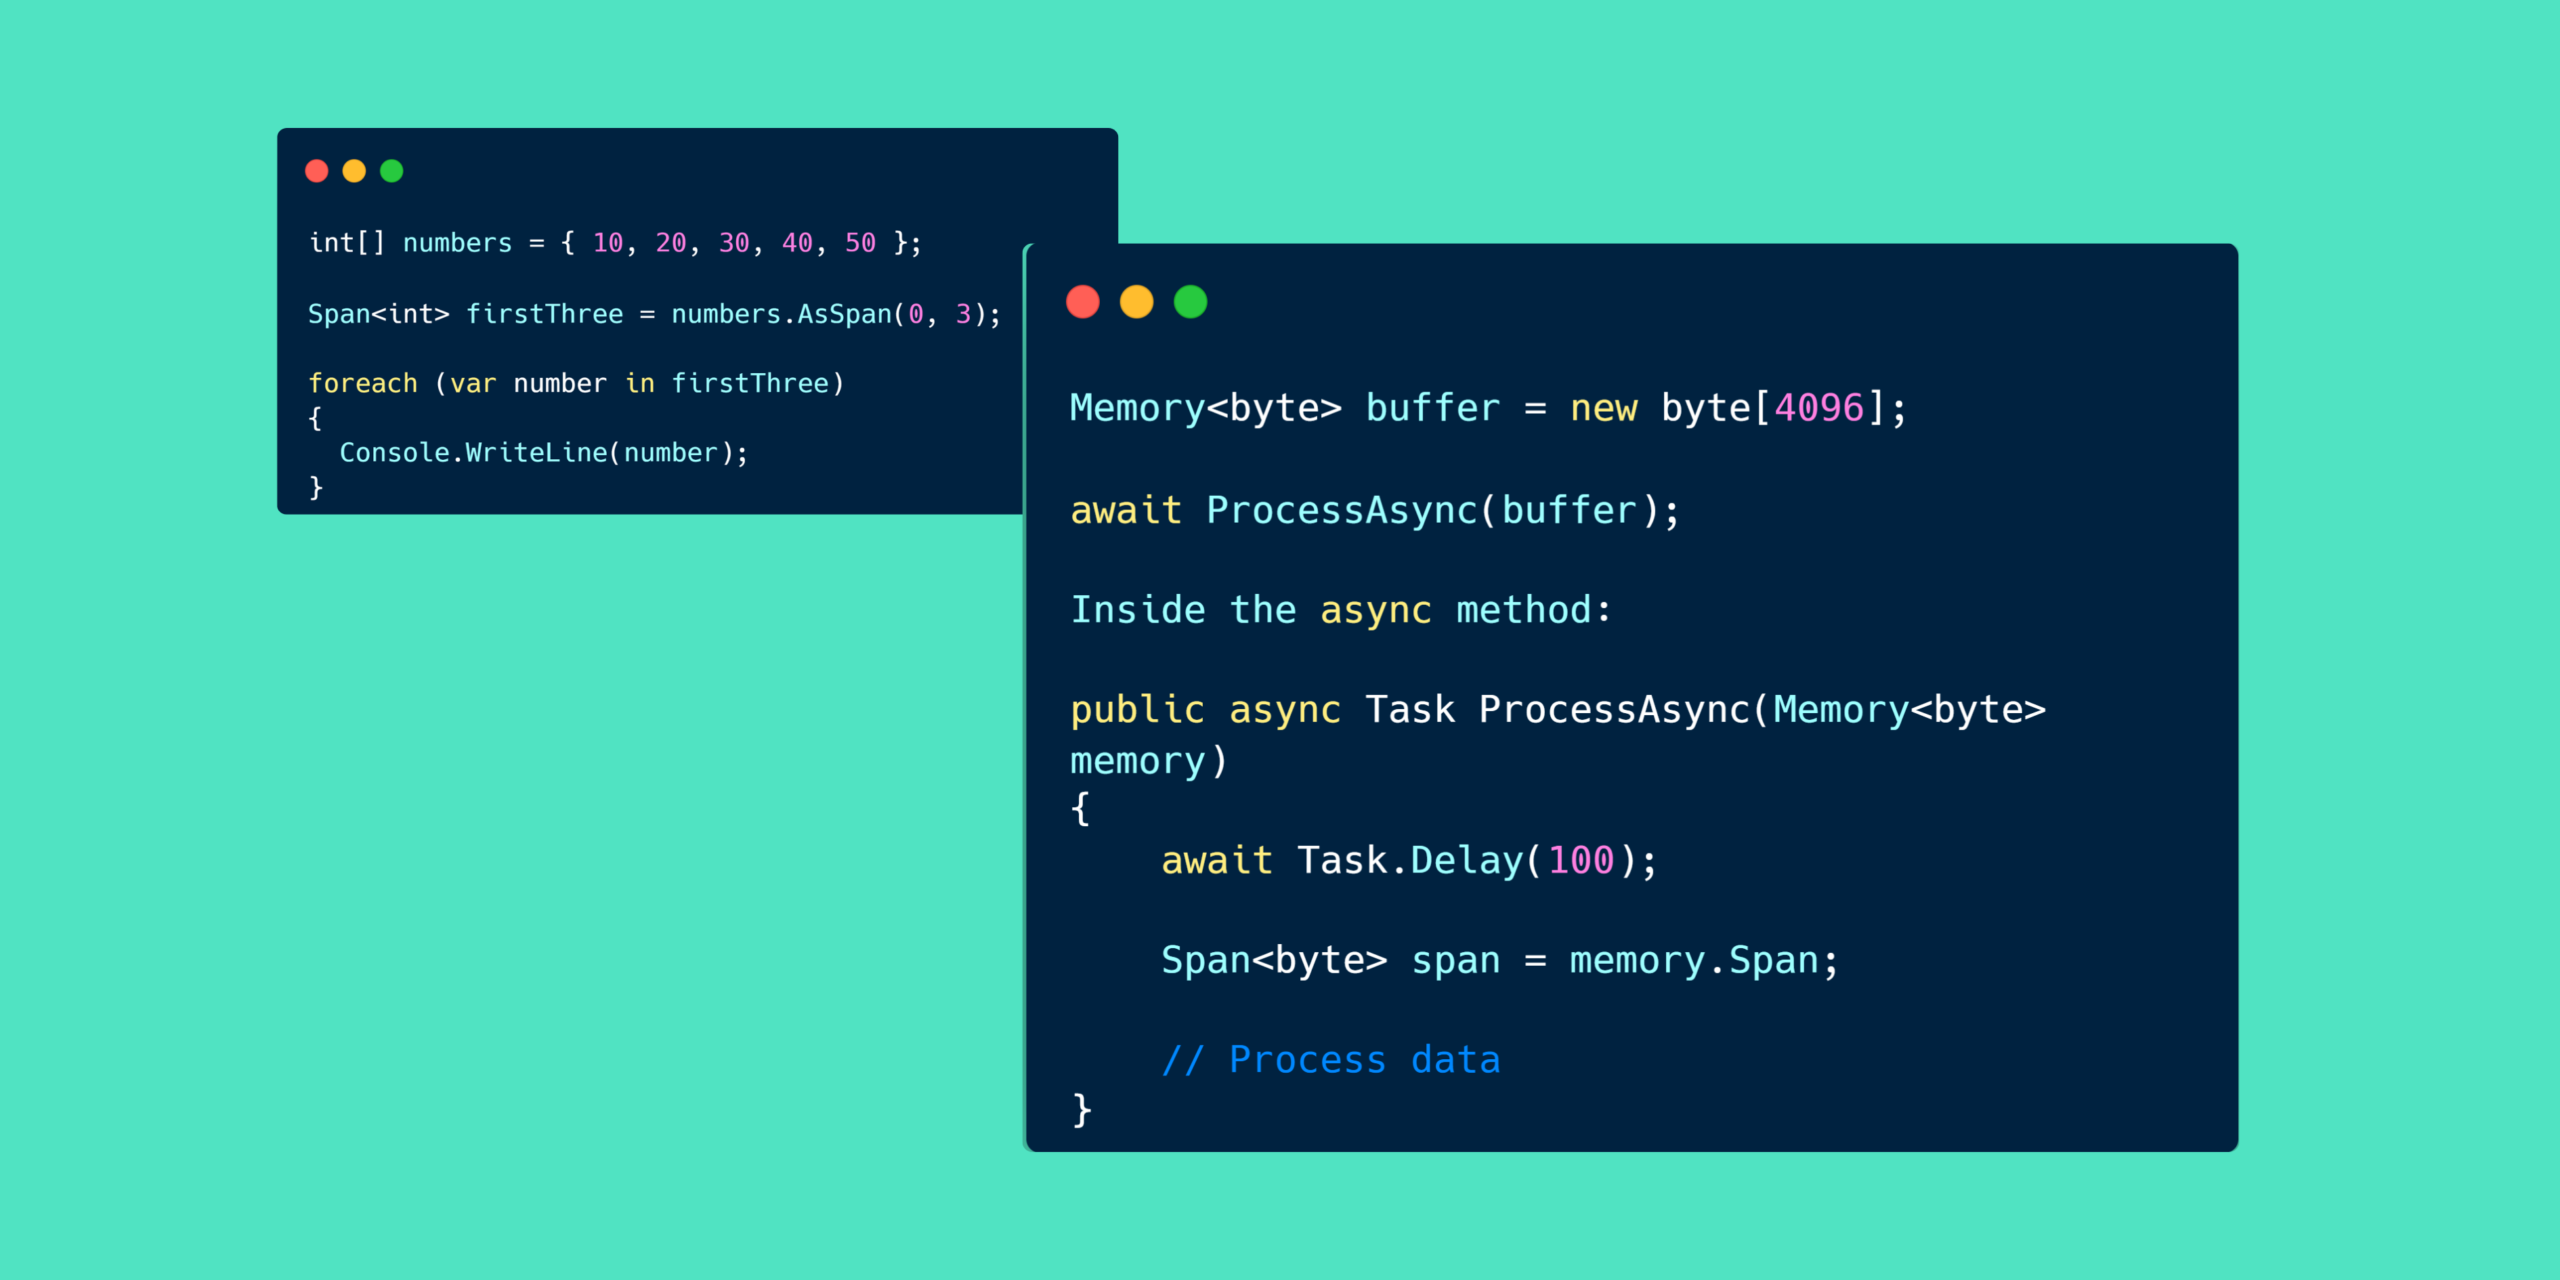
    Example:

    int[] numbers = { 10, 20, 30, 40, 50 };
    
    Span<int> firstThree = numbers.AsSpan(0, 3);
    
    foreach (var number in firstThree)
    {
        Console.WriteLine(number);
    }
    

    No new array is created.

    The span simply references the existing memory.


    Why is Span<T> Fast?

    Normally, slicing an array creates another array.

    var copy = numbers[0..3];
    

    This allocates additional memory.

    Using Span<T>:

    Span<int> slice = numbers.AsSpan(0, 3);
    

    No allocation.

    No copying.

    Less GC pressure.


    Important Limitation of Span<T>

    Span<T> is a stack-only type (ref struct).

    Because of this:

    • It cannot be stored in a class field.
    • It cannot be boxed.
    • It cannot implement interfaces.
    • It cannot be used across await or yield boundaries.

    These restrictions exist to ensure memory safety.


    What is Memory<T>?

    Memory<T> represents the same concept as Span<T>, but it can safely live on the managed heap.

    This means it works well in asynchronous and long-lived scenarios.

    Example:

    Memory<byte> buffer = new byte[4096];
    
    await ProcessAsync(buffer);
    

    Inside the async method:

    public async Task ProcessAsync(Memory<byte> memory)
    {
        await Task.Delay(100);
    
        Span<byte> span = memory.Span;
    
        // Process data
    }
    

    Memory<T> survives across await, while Span<T> cannot.


    Span vs Memory

    FeatureSpanMemory
    Stack-only
    Heap allocation
    Works with async
    Can be stored in fields
    Best forSynchronous operationsAsynchronous operations

    When Should You Use Each?

    Use Span<T> when:

    • Processing arrays
    • Parsing strings
    • Working synchronously
    • Optimizing performance-critical code

    Use Memory<T> when:

    • Working with async methods
    • Long-lived buffers
    • Pipelines
    • Network programming
    • File I/O

    Real-World Examples

    Span<T> is commonly used in:

    • String parsing
    • Serialization
    • JSON processing
    • High-performance algorithms

    Memory<T> is commonly used in:

    • ASP.NET Core
    • System.IO.Pipelines
    • Networking
    • Streaming large files

    Final Thoughts

    Span<T> and Memory<T> are powerful additions to modern .NET that help developers write faster, allocation-efficient code.

    The rule is simple:

    • Need fast, synchronous access? Use Span<T>.
    • Need async or long-lived memory? Use Memory<T>.

    Choosing the right type can reduce allocations, improve performance, and make your applications more scalable.

  • Microsoft Azure Fundamentals: A Beginner’s Guide to Cloud Computing

    Microsoft Azure Fundamentals: A Beginner’s Guide to Cloud Computing

    Cloud computing has become a core part of modern software development. Whether you’re building web applications, mobile apps, AI solutions, or enterprise systems, chances are you’ll interact with a cloud platform.

    One of the most popular cloud platforms is Microsoft Azure.

    If you’re new to Azure or preparing for the AZ-900: Microsoft Azure Fundamentals certification, understanding the core concepts is the best place to start.

    What is Microsoft Azure?

    Microsoft Azure is Microsoft’s cloud computing platform that provides hundreds of services for building, deploying, and managing applications.

    Instead of purchasing and maintaining physical servers, developers can use Azure to access computing resources whenever they need them.

    Azure offers services such as:

    • Virtual Machines
    • App Services
    • SQL Databases
    • Storage Accounts
    • Networking
    • AI and Machine Learning
    • Kubernetes
    • Serverless Computing
    • Identity Management

    This allows organizations to focus more on developing applications and less on managing infrastructure.


    Why Learn Azure?

    Learning Azure helps developers:

    • Build scalable applications
    • Deploy applications faster
    • Reduce infrastructure management
    • Improve application reliability
    • Integrate AI and modern cloud services
    • Work confidently in enterprise environments

    Cloud skills are now expected in many software engineering roles.


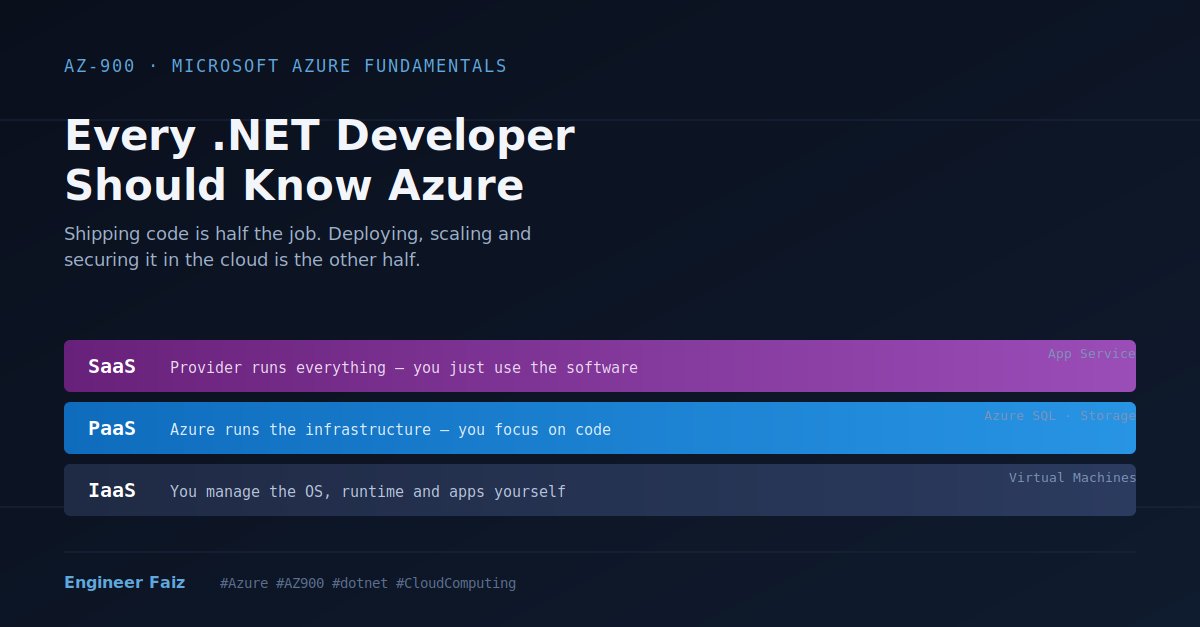
    The Three Cloud Service Models

    Azure provides three primary cloud service models.

    Infrastructure as a Service (IaaS)

    Azure manages the hardware, while you manage the operating system and applications.

    Examples:

    • Azure Virtual Machines
    • Virtual Networks

    Use when you need maximum control.


    Platform as a Service (PaaS)

    Azure manages the infrastructure and operating system, allowing you to focus on your application.

    Examples:

    • Azure App Service
    • Azure SQL Database

    Ideal for most web applications and APIs.


    Software as a Service (SaaS)

    The software is fully managed by the provider.

    Examples:

    • Microsoft 365
    • Outlook
    • Teams

    Users simply consume the application without worrying about infrastructure.


    Azure Regions and Availability Zones

    Azure operates data centers across the world.

    • Regions are geographic locations where Azure services are hosted.
    • Availability Zones are physically separate data centers within a region that improve application availability and fault tolerance.

    Designing applications across multiple zones helps minimize downtime.


    Core Azure Services Every Beginner Should Know

    Here are a few services you’ll encounter frequently:

    • Azure Virtual Machines – Run Windows or Linux servers.
    • Azure App Service – Host web apps and APIs without managing servers.
    • Azure Storage Account – Store files, blobs, queues, and tables.
    • Azure SQL Database – Fully managed relational database.
    • Azure Virtual Network (VNet) – Secure communication between Azure resources.
    • Azure Active Directory (Microsoft Entra ID) – Identity and access management.

    Who Should Learn Azure Fundamentals?

    Azure Fundamentals is suitable for:

    • Software Developers
    • Backend Engineers
    • DevOps Engineers
    • Cloud Engineers
    • Students
    • Solution Architects
    • Technical Managers

    Even if you’re not planning to become a cloud engineer, understanding Azure will help you design modern applications more effectively.


    Final Thoughts

    Cloud computing is no longer optional for modern software development.

    Microsoft Azure provides the tools to build secure, scalable, and highly available applications.

    If you’re beginning your cloud journey, mastering Azure Fundamentals is an excellent first step that will benefit your career and prepare you for more advanced Azure certifications.

  • 𝙎𝙩𝙧𝙞𝙣𝙜 𝙫𝙨 𝙎𝙩𝙧𝙞𝙣𝙜𝘽𝙪𝙞𝙡𝙙𝙚𝙧 𝙞𝙣 𝘾#: 𝘼𝙧𝙚 𝙔𝙤𝙪 𝙐𝙨𝙞𝙣𝙜 𝙩𝙝𝙚 𝙍𝙞𝙜𝙝𝙩 𝙊𝙣𝙚?

    𝙎𝙩𝙧𝙞𝙣𝙜 𝙫𝙨 𝙎𝙩𝙧𝙞𝙣𝙜𝘽𝙪𝙞𝙡𝙙𝙚𝙧 𝙞𝙣 𝘾#: 𝘼𝙧𝙚 𝙔𝙤𝙪 𝙐𝙨𝙞𝙣𝙜 𝙩𝙝𝙚 𝙍𝙞𝙜𝙝𝙩 𝙊𝙣𝙚?

    As .NET developers, we work with strings every day. Whether we’re building API responses, generating reports, or processing text, choosing the right type can significantly impact performance.

    One common question is:

    Should I use string or StringBuilder?

    The answer depends on how you’re using the text.

    Understanding string

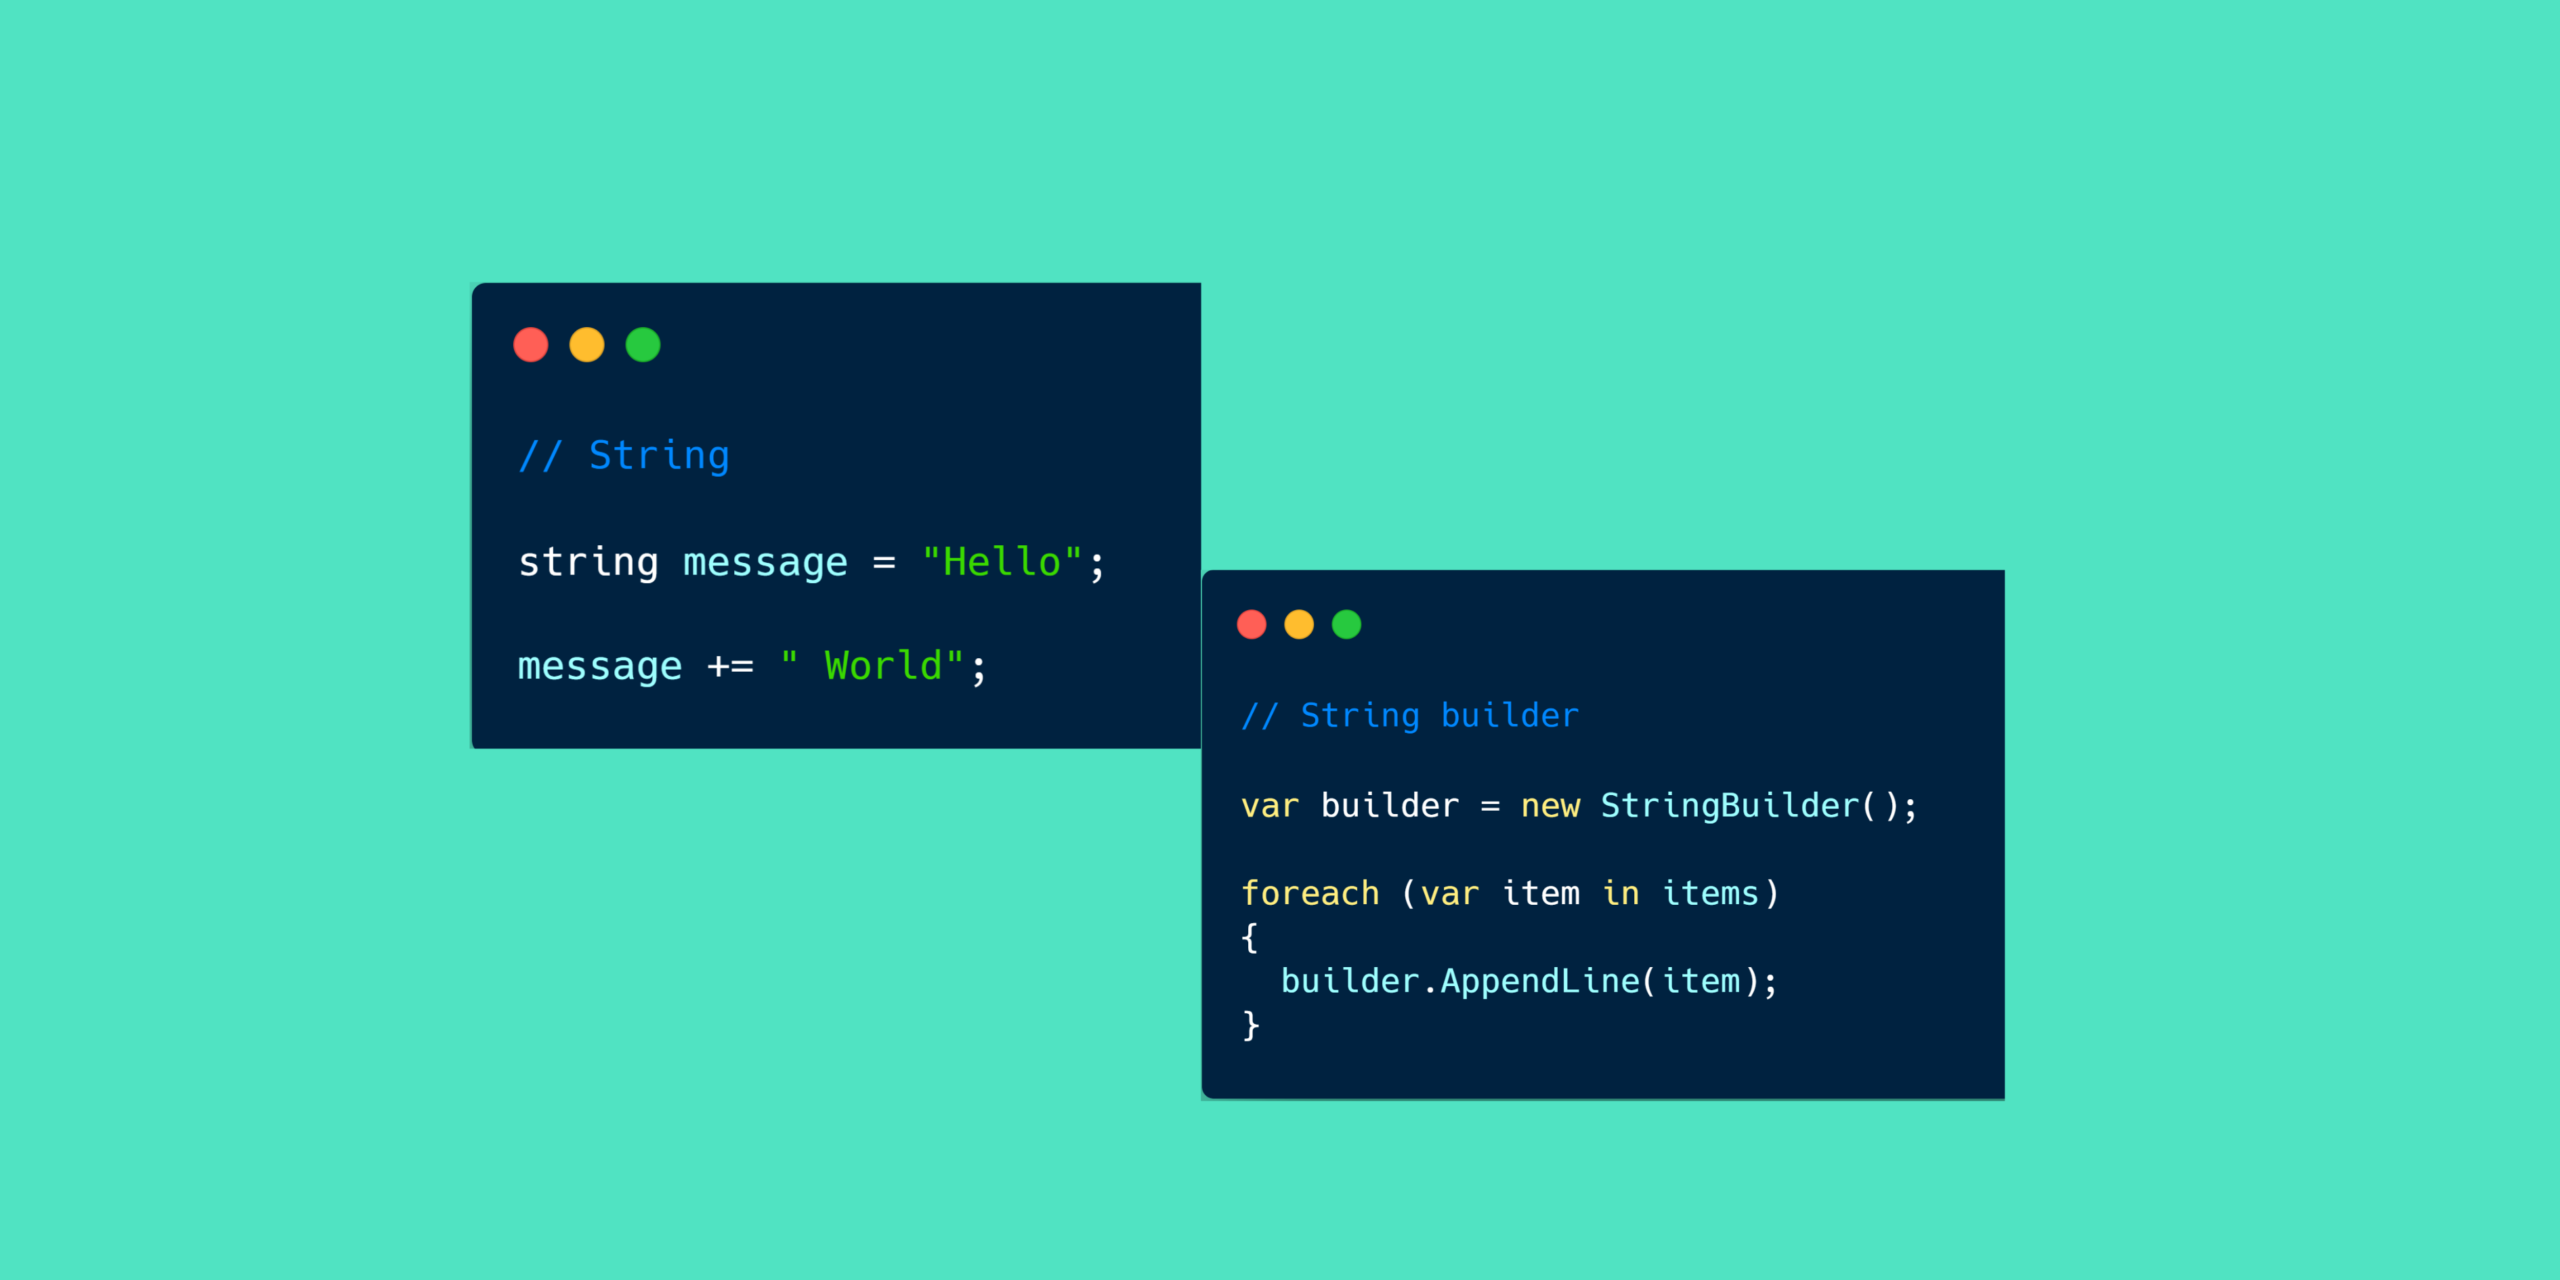
    In C#, a string is immutable.

    This means that once a string is created, its value cannot be changed.

    Whenever you modify a string, .NET creates a new string object in memory.

    Example:

    string message = "Hello";
    message += " World";
    message += "!";
    

    Although it looks like the original string is being modified, the runtime actually creates new string instances behind the scenes.

    For a few operations, this isn’t a problem. However, repeated modifications can lead to unnecessary memory allocations and reduced performance.


    Understanding StringBuilder

    StringBuilder is designed for scenarios where a string is modified multiple times.

    Instead of creating a new object for every change, it updates an internal buffer, reducing memory allocations.

    Example:

    var builder = new StringBuilder();
    
    builder.Append("Hello");
    builder.Append(" World");
    builder.Append("!");
    
    string result = builder.ToString();
    

    This approach is much more efficient when constructing large strings or performing repeated concatenations.


    Performance Comparison

    Imagine you’re generating a CSV file with thousands of rows.

    Using string:

    string csv = "";
    
    foreach (var item in items)
    {
        csv += item + Environment.NewLine;
    }
    

    Every iteration creates a new string object.

    Using StringBuilder:

    var builder = new StringBuilder();
    
    foreach (var item in items)
    {
        builder.AppendLine(item);
    }
    
    string csv = builder.ToString();
    

    Only the internal buffer grows as needed, making it much more memory-efficient.


    When Should You Use string?

    Use string when:

    • The value rarely changes.
    • You’re working with short text.
    • Only a few concatenations are needed.
    • Readability is more important than optimization.

    Examples:

    • User names
    • Email addresses
    • Status messages
    • Configuration values

    When Should You Use StringBuilder?

    Choose StringBuilder when:

    • Building large strings.
    • Concatenating inside loops.
    • Generating reports or CSV files.
    • Creating HTML or JSON manually.
    • Processing logs or large text blocks.

    Common Mistake

    Many developers use StringBuilder everywhere, assuming it is always faster.

    That’s not true.

    For small numbers of concatenations, string is often simpler and may even be just as efficient because the compiler and .NET runtime apply several optimizations.

    The key is to optimize only where it matters.


    Best Practices

    ✔ Use string for simple and infrequent concatenations.

    ✔ Use StringBuilder for repeated modifications or large text generation.

    ✔ Measure performance before optimizing.

    ✔ Prioritize clean, readable code unless profiling shows a bottleneck.

    Final Thoughts

    Both string and StringBuilder have their place in modern C# development.

    Choosing the right one isn’t about following a rule—it’s about understanding how your application works and selecting the tool that best fits the scenario.

    As developers, writing efficient code starts with understanding the fundamentals.

  • Dependency Injection in .NET: The Key to Maintainable Code

    Dependency Injection in .NET: The Key to Maintainable Code

    When developing enterprise applications, one common challenge is managing dependencies between different components.

    A tightly coupled application becomes difficult to maintain because changing one component may require changes across multiple areas of the system.

    Dependency Injection (DI) is a design pattern that helps solve this problem by creating loosely coupled, testable, and maintainable applications.

    What is Dependency Injection?

    Dependency Injection is a technique where an object receives its required dependencies from an external source instead of creating them internally.

    In simple words:

    A class should not create the objects it depends on. Instead, those objects should be provided to it.

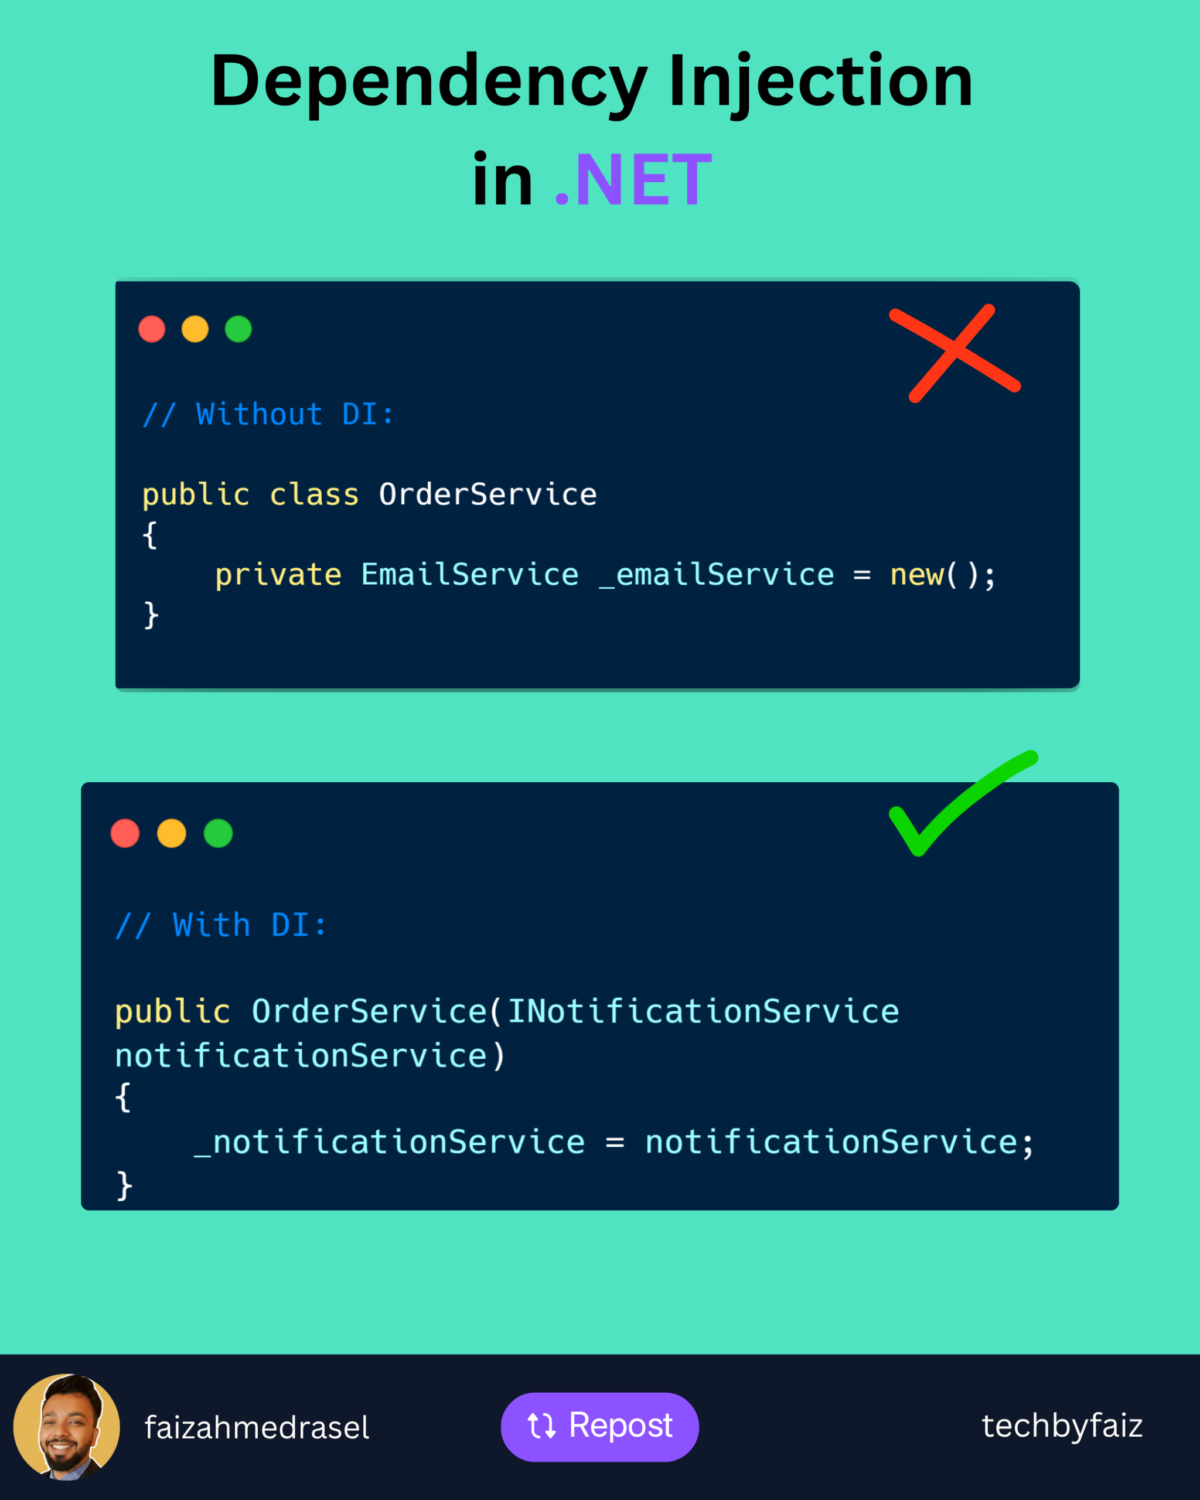
    Without Dependency Injection

    Example:

    public class OrderService
    {
        private readonly EmailService _emailService;
    
        public OrderService()
        {
            _emailService = new EmailService();
        }
    
        public void PlaceOrder()
        {
            _emailService.SendEmail();
        }
    }
    

    Here, OrderService directly creates an instance of EmailService.

    Problems:

    • Tight coupling
    • Difficult unit testing
    • Hard to replace implementations
    • Less flexible architecture

    Imagine tomorrow the business wants SMS notification instead of email. We need to modify the OrderService class.

    With Dependency Injection

    Using an abstraction:

    public interface INotificationService
    {
        void Send(string message);
    }
    
    public class OrderService
    {
        private readonly INotificationService _notificationService;
    
        public OrderService(INotificationService notificationService)
        {
            _notificationService = notificationService;
        }
    
        public void PlaceOrder()
        {
            _notificationService.Send("Order completed");
        }
    }
    

    Now OrderService does not care whether the notification is sent by email, SMS, or another service.

    It only depends on the contract.

    Benefits of Dependency Injection

    1. Loose Coupling

    Classes depend on abstractions rather than concrete implementations.

    2. Better Testability

    Dependencies can easily be replaced with mock objects during unit testing.

    3. Better Maintainability

    New implementations can be added without modifying existing business logic.

    4. Improved Scalability

    Large applications become easier to manage when components are independent.

    Dependency Injection Lifetimes in ASP.NET Core

    ASP.NET Core provides three built-in lifetimes.

    Transient

    A new instance is created every time the service is requested.

    Suitable for lightweight, stateless services.

    services.AddTransient<IEmailService, EmailService>();
    

    Scoped

    One instance is created per HTTP request.

    Commonly used for database-related services.

    services.AddScoped<IOrderService, OrderService>();
    

    Singleton

    A single instance exists throughout the application lifetime.

    Useful for caching or configuration services.

    services.AddSingleton<ICacheService, CacheService>();
    

    Common DI Mistakes

    Some developers use DI without understanding service lifetimes.

    Examples:

    • Using Singleton with a Scoped dependency
    • Registering everything as Singleton
    • Creating unnecessary abstractions

    DI is not only about registering services. It is about designing better software boundaries.

    Final Thoughts

    Dependency Injection is one of the fundamental concepts behind modern .NET application architecture.

    It helps developers create applications that are easier to test, maintain, and extend.

    Understanding DI properly is essential for building scalable enterprise applications.